Note: The following information was gathered from an outside source and is subject to change.
How do I delete my browser cache?
Google Chrome:
- On your computer, open Chrome.
- At the top right, click More.
- Click More tools
Clear browsing data.
- At the top, choose a time range. To delete everything, select All time.
- Next to "Cookies and other site data" and "Cached images and files," check the boxes.
- Click Clear data.
Learn how to change more cookie settings in Chrome. For example, you can delete cookies for a specific site.
Mobile - Android:
In the Chrome app
- On your Android phone or tablet, open the Chrome app.
- At the top right, tap More.
- Tap History
- At the top, choose a time range. To delete everything, select All time.
- Next to "Cookies and site data" and "Cached images and files," check the boxes.
- Tap Clear data.
Learn how to change more cookie settings in Chrome.
Mobile - Iphone, and Ipad:
In the Chrome app
- On your iPhone or iPad, open the Chrome app.
- At the top right, tap More.
- Tap History
- Make sure there’s a check mark next to "Cookies, site data" and "Cached images and files."
- Tap Clear browsing data.
Learn how to change more cookie settings in Chrome.
[Chrome OS] Manage pop-ups
Google Chrome prevents pop-ups from automatically appearing and cluttering your screen. Whenever the browser blocks pop-ups for a site, the  icon appears in the address bar. Click the icon to see the pop-ups that have been blocked or to manage pop-up settings for the site.
If you're having trouble blocking pop-ups, saving your homepage, startup page, or search engine, then you may have malware. Get help restoring your settings.
See pop-ups for a specific site
To see blocked pop-ups for a site, follow the steps listed below:
- If pop-ups have been blocked, you'll see the icon in the address bar. Click the icon to see a list of the blocked pop-ups.
- Click the link for the pop-up window that you'd like to see.
- To always see pop-ups for the site, select "Always show pop-ups from [site]." The site will be added to the exceptions list, which you can manage in the Content Settings dialog.
To manually allow pop-ups from a site, follow the steps below:
- Click the Chrome menu
on the browser toolbar.
- Select Settings.
- Click Show advanced settings.
- in the "Privacy" section, click the Content settings button.
- In the "Pop-ups" section, click Manage exceptions.
Allow all pop-ups
You can allow all pop-ups by disabling the pop-up blocker. Follow these steps:
- Click the Chrome menu
- Select Settings.
- Click Show advanced settings.
- in the "Privacy" section, click the Content settings button.
- In the "Pop-ups" section, select "Allow all sites to show pop-ups." Customize permissions for specific websites by clicking Manage exceptions.
In Safari:
SAFARI 8.0 - 10.0 (MAC) - CLEARING CACHE AND COOKIES
This document explains how to clear cache and cookies in Safari 8.0 to 10.0.
- Click Safari in the upper left-hand side of your screen. In the menu that appears, click Preferences.
2. In the window that appears, click the Privacy tab. Click the button Remove All Website Data...
3. Click Remove Now in the pop-up window that appears.
In Safari App Iphone-Ipad:
Delete history, cache, and cookies
Here's how to clear information from your device:
- To clear your history and cookies, tap Settings > Safari > Clear History and Website Data. Clearing your history, cookies, and browsing data from Safari won't change your AutoFill information.
- To clear your cookies and keep your history, tap Settings > Safari > Advanced > Website Data > Remove All Website Data.
- To visit sites without leaving a history, turn private browsing on or off.
When there's no history or website data to clear, the setting turns gray. The setting might also be gray if parental controls are set for websites. To check your settings, go to Settings > General > Restrictions, scroll to Allowed Content, then tap Websites.
Safari: Enable/Disable Pop-up Blocker
Posted on by Mitch Bartlett Leave a Comment
How to enable or disable the pop-up blocker in the Apple Safari web browser for MacOS Sierra.
Safari 10 for MacOS Sierra
Option 1
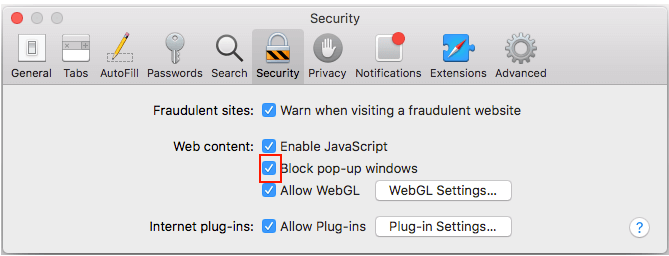
- Windows users select “Safari” > “Preferences“.
- Click on “Security” at the top of the window.
- Check the box “Block pop-up windows” to enable this feature. Uncheck it to disable it.
Option 2
- From Utilities, launch the Terminal app.
- To disable popup blocker, type:
defaults write com.apple.Safari com.apple.Safari.ContentPageGroupIdentifier.WebKit2JavaScriptCanOpenWindowsAutomatically -bool trueTo enable popup blocker, type:
defaults write com.apple.Safari com.apple.Safari.ContentPageGroupIdentifier.WebKit2JavaScriptCanOpenWindowsAutomatically -bool false - Press “Enter“, and the command sets to popup blocker setting as desired.
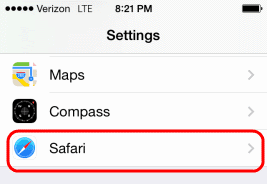
iOS Version
- From the Home screen, select “Settings“.
- Choose “Safari“
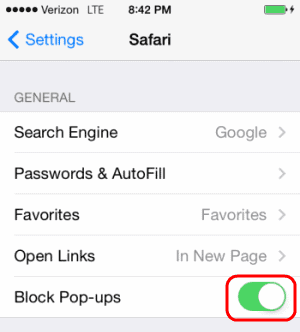
- Slide the “Block Pop-ups” to “On” (green) to block pop-ups, or slide it to “Off” (white) to never block pop-ups.
In Firefox:
Clear the cache
- Click the menu button and
 choose Options.
 - Select the Privacy & Security panel.
- In the Cookies and Site Data section, click Clear Data….
- Remove the check mark in front of Cookies and Site Data.
- For more information about managing site data, see Manage local site storage settings.
- With Cached Web Content check marked, click the Clear button.
- Close the about: preferences page. Any changes you've made will automatically be saved.

Automatically clear the cache
You can set Firefox to automatically clear the cache when Firefox closes:
- Click the menu button and choose Options.
- Select the Privacy & Security panel.
- In the History section, set Firefox will to Use custom settings for history.
- Select the check box for Clear history when Firefox closes.
- Beside Clear history when Firefox closes, click the Settings… button. The Settings for Clearing History window will open.
- In the Settings for Clearing History window, put a check mark next to Cache.
- For more information on the other options, see Delete browsing, search and download history on Firefox.
- Click OK to close the Settings for Clearing History window.
- Close the about: preferences page. Any changes you've made will automatically be saved.

Tip: There are several add-ons available that will allow you to clear the cache using an icon on your toolbar. Go to the Mozilla Add-ons Web Page to do a search.
Firefox Ipad-Iphone:
- Tap the menu button in the bottom-center,
- In the menu, swipe to the left until you see the Settings icon, then tap on Settings.
- Open the Clear Private Data panel.
- Tap on Clear Private Data.
Firefox Android:
Clear your entire browsing history
- Go to the History panel on your home screen.
- Tap on Clear browsing history at the bottom of the History panel.
- Tap OK to confirm.
Clear specific items from your browser
- Tap the menu button (either below the screen on some devices or at the top-right corner of the browser) and select Settings (you may need to tap More first).
- Tap Clear private data.
- Put a check mark next to the items you want to clear and then tap Clear data.
Delete data on exit
This option automatically deletes your selected data (bookmarks, browsing or search history, saved passwords, and more) every time you quit Firefox:
- Tap the menu button (either below the screen on some devices or at the top-right corner of the browser) and select Settings (you may need to tap More first).
- Tap Privacy and put a check mark next to Clear private data on exit.
- In the pop-up window, select the types of information that you'd like to delete each time you quit Firefox, then tap Set.
Firefox will delete your information each time you close it through the Quit option on the menu.
In Internet Explorer:
View and delete your browsing history in Internet Explorer
Applies to: Internet ExplorerWindows 10Windows 8.1More
Your browsing history is the info that Internet Explorer stores on a PC as you surf the web. To help improve your experience, this includes the info you've entered into forms, passwords, and sites you've visited. However, if you're using a shared or public PC, you may not want Internet Explorer to save your history.
View your browsing history and delete specific sites
By viewing your browsing history, you can choose to delete specific sites or return to a webpage that you've already visited.
- In Internet Explorer, select the Favorites button.
- Select the History tab, and choose how you want to view your history by selecting a filter from the menu. To delete specific sites, right-select a site from any of these lists and then select Delete. Or, return to a page by selecting any site in the list.
Delete your browsing history
Regularly deleting your browsing history helps protect your privacy, especially if you're using a shared or public PC.
Show allTo delete browsing history in Internet Explorer 11 and Internet Explorer 10- In Internet Explorer, select the Tools button, point to Safety, and then select Delete browsing history.
- Choose the types of data or files you want to remove from your PC, and then select Delete.
Aditional information:
What happens after you clear this info
After you clear cache and cookies:
- Some settings on sites get deleted. For example, if you were signed in, you’ll need to sign in again.
- Some sites can seem slower because content, like images, needs to load again.
How cache & cookies work
- Cookies are files created by sites you visit. They make your online experience easier by saving browsing data.
- The cache remembers parts of pages, like images, to help them open faster during your next visit.
Zoom in or out on your current page - Chrome
Use the zoom options to make everything on a webpage larger or smaller.
- On your computer, open Chrome.
- At the top right, click More.
- Next to "Zoom," choose the zoom options you want:
- Make everything larger: Click Zoom in.
- Make everything smaller: Click Zoom out.
- Use full-screen mode: Click Full screen.
- Make everything larger: Click Zoom in.

Zoom in and out of a website - Firefox
Here's how you can zoom in and out of individual websites.
- Click the menu button on the right. The customization menu will open and you will see the zoom controls at the top.
- Use the + button to zoom in, and the - button to zoom out. The number in the middle is the current zoom level - click it to reset the zoom to 100%. You can also see the current zoom level in the address bar:


Keyboard shortcuts: You can also use the zoom controls without a mouse. Press and hold Ctrl while pressing + to zoom in, - to zoom out, or 0 to reset
Pop-up blocker settings
To access the pop-up blocker settings:
- Click the menu button and choose Options.
- Select the Privacy & Security panel.
- Under the Permissions section, uncheck the box next to Block pop-up windows to disable the pop-up blocker altogether.
- A click on Exceptions… opens a dialog box with a list of sites that you want to allow to display pop-ups.
- The dialog box offers you the following choices:

- Allow: Click this to add a website to the exceptions list.
- Remove Site: Click this to remove a website from the exceptions list.
- Remove All Sites: Click this to remove all of the websites in the exceptions list.
Note: Blocking pop-ups may not always work and may interfere with some websites. For more information, see the What are Pop-ups? section above.
Zoom in and out of a website - Internet Explorer 9 - 10 - 11
Internet Explorer offers many options to help you browse the web more easily.
For Internet Explorer 11, Internet Explorer 10, and Internet Explorer 9
- Open Internet Explorer, select the Tools button and then select Zoom.
- Select a predefined zoom level, or select a custom level by selecting Custom and entering a zoom value.
Pop up Blocker IE v11
Pop-up Blocker limits or blocks pop-ups on sites that you visit. You can choose the level of blocking you prefer, turn on or off notifications when pop-ups are blocked, or create a list of sites that you don't want to block pop-ups on. Pop-up Blocker settings only apply to Internet Explorer.
To turn Pop-up Blocker on or off
- Open Internet Explorer, select the Tools button, and then select Internet options.
- On the Privacy tab, under Pop-up Blocker, select or clear the Turn on Pop-up Blocker check box, and then select OK.
Block all pop-ups
- Open Internet Explorer, select the Tools button, and then select Internet options.
- On the Privacy tab, under Pop-up Blocker, select Settings.
- In the Pop-up Blocker settings dialog box, under Blocking level, set the blocking level to High: Block all pop-ups (Ctrl + Alt to override).
- Select Close, and then select OK.
Turn off notifications when pop-ups are blocked
- Open Internet Explorer, select the Tools button, and then select Internet options.
- On the Privacy tab, under Pop-up Blocker, select Settings.
- In the Pop-up Blocker settings dialog box, clear the Show Notification bar when a pop-up is blocked check box.
- Select Close, and then select OK.
Microsoft EDGE:
EDGE (WIN) - CLEARING CACHE AND COOKIES
This document explains how to clear the cache and cookies in Edge.
- Select the Hub icon (three horizontal lines at top bar in front of a star), click the History menu option, and then click Clear history.
NOTE: You can also access this menu by holding Ctrl + Shift + Delete. By using this shortcut you may skip down to step 3.

- Select "Cookies and saved website data" and "Cached data and files". After the two are marked click Clear.
